Introduction
One of the lesser known tricks that you can do with Firefox 3.5 and above, is apply SVG clipping paths, masks and filters to HTML content. You can read more detail about the technique here:
http://weblogs.mozillazine.org/roc/archives/2008/06/applying_svg_ef.html
That’s all very nice and impressive in theory, but in practice actually creating an SVG filter to do the job you want is a less than intuitive process. For some common uses – such as drop shadows – you’re better off using the CSS3 native code, such as box-shadow and text-shadow. But other effects really do need the power of SVG filters.
Luckily there’s an easier method for creating filters than coding them by hand: Inkscape. This is an Open Source vector graphics editor which uses SVG as its native file format. It’s a powerful program – certainly powerful enough that I use it to create my webcomic, The Greys – and it not only has a user interface for creating filter chains but, more importantly, it has a lot of good filters pre-defined.
To be fair, the UI for creating and modifying filters leaves a lot to be desired and is only a little better than coding them by hand. It would be a lot better if it were possible to select one of the intermediate filter steps in order to see the effect of the filter up to that point, as that would make it easier to understand how some of the more involved filter chains work. As it stands it’s a functional but somewhat inelegant way to set up filter chains without having to remember which filter primitives take which parameters.
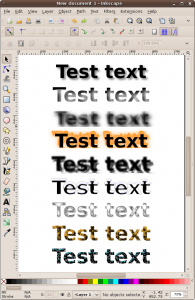
Thankfully version 0.47 of Inkscape introduced a Filters menu which contains dozens of pre-defined SVG filter chains. Applying one of these filters is as simple as selecting a target object in the main Inkscape window and choosing the filter that takes your fancy. Below you can see the results of duplicating a line of text a few times and applying a handful of filters straight from the menu.
Basic Code
So we’ve got a browser that can apply SVG filters to HTML content, a blog entry describing how to do it, and a whole load of ready-made filters, just ripe for the picking. How do we combine these into one fancy HTML page? First of all, let’s start with a basic bit of HTML using the simplest of SVG filters, “feBlur”:
<html xmlns="http://www.w3.org/1999/xhtml">
<body>

<svg xmlns="http://www.w3.org/2000/svg" height="0">
  <filter id="f1">
    <feGaussianBlur id="blur-filter1" stdDeviation="5"/>
  </filter>
</svg>

<style>
  .blur { filter:url(#f1); }
</style>

<h1 class="blur">This is an example of SVG filtered text</h1>

</body>
</html>
Save this with an “xhtml” extension (it needs to be XHTML, not just HTML, because we’re mixing XML languages using different namespaces – if you want to serve this online, you’ll need to make sure you use the correct XHTML mimetype). Then load it into Firefox >= 3.5 and you should see something like this:
Okay, let’s dissect the code so that it’s easier to work out what goes where as we move forward. First there’s the usual XML preamble and opening HTML tag. Next comes an SVG section which contains the filter itself. This is the most significant change from the original post linked above: rather than declaring the SVG namespace at the top of the page and then prefixing every SVG element, I’ve chosen to declare the default namespace on the SVG element itself. This means that the child elements don’t need to be prefixed – which will save us a lot of time when we start to introduce more complex filters. The filter is given an ID of “f1” so that we can refer to it later. Not much later, as it happens…
The next section is a simple CSS style rule which attaches the filter with an ID of “f1” to any element with a class name of blur.
Finally there’s the actual HTML – in this case an H1 tag to give us some big bold text to work on, as some of the filters don’t have much of an effect on thin small elements. To make extra certain you could, of course, add some additional styling to the .blur CSS declaration to ensure big bold fonts, but I’m trying to keep the markup clear of extraneous extras here.
Okay, that’s not too tricky. An SVG filter with an ID, a stylesheet to map that ID to a class, and some content that has that class. So what happens if we want to apply a more complex SVG filter to the text? Let’s start by creating an Inkscape file that uses it…
Getting Filters from Inkscape
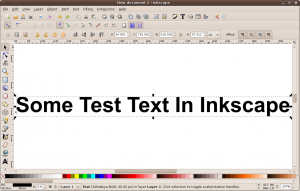
Let’s fire up Inkscape and create a new SVG document containing our filter of choice. By default Inkscape starts with a blank canvas, so we just need to add some content and a filter to it. Because we’re aiming to style some HTML text, it makes sense to test Inkscape’s filters using a text object – but you can use any other Inkscape object, or even drag an image into the page, if you prefer:
0) I’m starting at zero because this is a non-essential pre-requisite step that will just make your filters a little easier to copy-and-paste later. In Inkscape select Inkscape Properties from the File menu, then find and select the SVG output section on the left. Make sure the Inline attributes option is checked, and set the Indent, spaces setting to something low (I use 2). These changes ensure that your filters don’t end up taking up dozens of lines in your text editor by putting each attribute on a separate line, and that any deeply-nested filter chains don’t go flying too far off the right of your screen.
1) Select the text tool from the toolbar on the left: ![]()
2) Using the toolbar at the top of the canvas, set some parameters for your text. Here I’ve chosen to use Arial as the font, with a size of 40px, left aligned, and emboldened. Setting the font size to something fairly large, and making it bold, both mean that there’s a larger drawn area for the filter to work on – some of the filters appear to have little or no effect if your target object is too small or thin.
3) Click on the canvas and type something.
4) Switch back to the selection tool (the arrow icon at the top of the toolbar on the left), and make sure your text is selected. If you’re not certain, click well away from it on the background of the canvas to de-select it, then click on the text to select it.
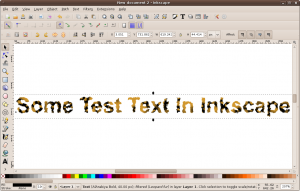
5) Pick a pre-defined filter from the Filters menu to try out. For our purposes we’ll use Leopard fur from the Materials sub-menu. You should see something like this:
6) Save the file, ensuring that you pick “Plain SVG” as the file format. If you inadvertently leave it as “Inkscape SVG” it won’t cause any problems, but you’ll have some unnecessary cruft in your file that you’ll have to work round or ignore later.
If you’ve been following along at home your file will look like this (it will be a bit different if you used another filter, and a lot longer if you skipped step 0):
<?xml version="1.0" encoding="UTF-8" standalone="no"?>
<!-- Created with Inkscape (http://www.inkscape.org/) -->

<svg xmlns:svg="http://www.w3.org/2000/svg" xmlns="http://www.w3.org/2000/svg" version="1.1" width="744.09448" height="1052.3622" id="svg3528">
  <defs id="defs3530">
    <filter color-interpolation-filters="sRGB" id="filter4196">
      <feTurbulence baseFrequency="0.143" numOctaves="5" type="fractalNoise" id="feTurbulence4198" />
      <feColorMatrix result="result1" values="0 0 0 0 0 0 0 0 0 0 0 0 0 0 0 0 0 0 5 -3.45" id="feColorMatrix4200" />
      <feComposite in2="SourceAlpha" operator="in" result="result3" id="feComposite4202" />
      <feColorMatrix values="1 0 0 0 0 0 1 0 0 0 0 0 1 0 0 0 0 0 6 0" id="feColorMatrix4204" />
      <feMorphology result="result3" radius="1.8" operator="dilate" id="feMorphology4206" />
      <feGaussianBlur result="result3" stdDeviation="1" id="feGaussianBlur4208" />
      <feGaussianBlur result="result4" stdDeviation="2.7" id="feGaussianBlur4210" />
      <feComposite in2="result3" operator="out" result="result1" id="feComposite4212" />
      <feColorMatrix result="result3" values="0 0 0 0 0 0 0 0 0 0 0 0 0 0 0 0 0 0 6 0" id="feColorMatrix4214" />
      <feFlood result="result2" flood-opacity="1" flood-color="rgb(209,151,45)" id="feFlood4216" />
      <feComposite in2="SourceGraphic" operator="in" in="result2" result="result91" id="feComposite4218" />
      <feComposite in2="result91" operator="atop" in="result3" result="result3" id="feComposite4220" />
      <feGaussianBlur stdDeviation="7.2" in="SourceAlpha" id="feGaussianBlur4222" />
      <feDiffuseLighting result="result92" diffuseConstant="1.91999996" surfaceScale="10.60000038" id="feDiffuseLighting4224">
        <feDistantLight azimuth="225" elevation="48" id="feDistantLight4226" />
      </feDiffuseLighting>
      <feBlend in2="result3" mode="multiply" result="result3" id="feBlend4228" />
      <feComposite in2="SourceAlpha" operator="in" result="result3" id="feComposite4230" />
      <feTurbulence result="result92" baseFrequency="0.106" numOctaves="3" id="feTurbulence4232" />
      <feDisplacementMap in2="result92" scale="4.5" xChannelSelector="R" yChannelSelector="G" in="result3" id="feDisplacementMap4234" />
    </filter>
  </defs>
  <g id="layer1">
    <text x="53.20932" y="308.90967" id="text3538" xml:space="preserve" style="font-size:40px;font-style:normal;font-variant:normal;font-weight:bold;font-stretch:normal;fill:#000000;fill-opacity:1;stroke:none;filter:url(#filter4196);font-family:Arial;-inkscape-font-specification:AlArabiya Bold"><tspan x="53.20932" y="308.90967" id="tspan3540">Some Test Text In Inkscape</tspan></text>
  </g>
</svg>
Phew! There appears to be a lot going on in there – but that’s just because I’ve used a particularly complex filter. In practice we just want to copy the filter section into our HTML file, add a CSS rule to map it to our HTML and add some corresponding HTML. It doesn’t matter which filter you use in your Inkscape file, the basic steps are the same:
1) Start with the XHTML example file at the top of this page. We’ll add the new filter to it, but I’m sure you can work out how to completely replace the existing one if you want to
2) Copy the filter code from the SVG file. This is everything from the line that starts with <filter… to the line that ends with <filter/> – including the start and end lines themselves
3) Paste the filter code into the HTML document below the existing filter (i.e. just below the existing <filter/> line)
4) You can give the filter a shorter, snappier ID if you want – or stick with the Inkscape-generated one. In this case Inkscape has generated “filter4196” (at the end of the <filter… line), so I’ll replace it with “f2”
5) Duplicate the CSS line which currently maps the “blur” class to the “f1” filter. Edit the duplicate line with a new class name and the right ID for the new filter – in my case I’ve picked a class of “leopard” and changed the filter ID to “f2”
6) Add some HTML using the class you defined above
7) Save your XHTML file, and load it into Firefox
Here’s what my final file looks like:
<html xmlns="http://www.w3.org/1999/xhtml">

<body>

<svg xmlns="http://www.w3.org/2000/svg" height="0">
  <filter id="f1">
    <feGaussianBlur id="blur-filter1" stdDeviation="5"/>
  </filter>

  <filter color-interpolation-filters="sRGB" id="f2">
    <feTurbulence baseFrequency="0.143" numOctaves="5" type="fractalNoise" id="feTurbulence4198" />
    <feColorMatrix result="result1" values="0 0 0 0 0 0 0 0 0 0 0 0 0 0 0 0 0 0 5 -3.45" id="feColorMatrix4200" />
    <feComposite in2="SourceAlpha" operator="in" result="result3" id="feComposite4202" />
    <feColorMatrix values="1 0 0 0 0 0 1 0 0 0 0 0 1 0 0 0 0 0 6 0" id="feColorMatrix4204" />
    <feMorphology result="result3" radius="1.8" operator="dilate" id="feMorphology4206" />
    <feGaussianBlur result="result3" stdDeviation="1" id="feGaussianBlur4208" />
    <feGaussianBlur result="result4" stdDeviation="2.7" id="feGaussianBlur4210" />
    <feComposite in2="result3" operator="out" result="result1" id="feComposite4212" />
    <feColorMatrix result="result3" values="0 0 0 0 0 0 0 0 0 0 0 0 0 0 0 0 0 0 6 0" id="feColorMatrix4214" />
    <feFlood result="result2" flood-opacity="1" flood-color="rgb(209,151,45)" id="feFlood4216" />
    <feComposite in2="SourceGraphic" operator="in" in="result2" result="result91" id="feComposite4218" />
    <feComposite in2="result91" operator="atop" in="result3" result="result3" id="feComposite4220" />
    <feGaussianBlur stdDeviation="7.2" in="SourceAlpha" id="feGaussianBlur4222" />
    <feDiffuseLighting result="result92" diffuseConstant="1.91999996" surfaceScale="10.60000038" id="feDiffuseLighting4224">
      <feDistantLight azimuth="225" elevation="48" id="feDistantLight4226" />
    </feDiffuseLighting>
    <feBlend in2="result3" mode="multiply" result="result3" id="feBlend4228" />
    <feComposite in2="SourceAlpha" operator="in" result="result3" id="feComposite4230" />
    <feTurbulence result="result92" baseFrequency="0.106" numOctaves="3" id="feTurbulence4232" />
    <feDisplacementMap in2="result92" scale="4.5" xChannelSelector="R" yChannelSelector="G" in="result3" id="feDisplacementMap4234" />
  </filter>
</svg>

<style>
  .blur { filter:url(#f1); }
  .leopard { filter:url(#f2); }
</style>

<h1 class="blur">This is an example of SVG filtered text</h1>
<h1 class="leopard">This is another example of SVG filtered text, now with leopard print!</h1>

</body>
</html>
And here’s what it looks like when I load it into Firefox:
You can rinse and repeat this process to add as many SVG filters as you like to your HTML content. Some work better than others, and some work better on images than text (yes, you can apply SVG filters to images in your HTML as well). The fact that inkscape provides an extensive library of pre-defined filters, and an opportunity to see them in action and even tweak them if you want to, means that producing the right filter for your needs is a lot easier than it would otherwise be.
Multiple Filters On One Object
It’s quite common to use multiple classes on a single element in HTML. The CSS rules cascade, with identical CSS properties overriding each other. Set the “font-size” in one selector, and it can be overridden by “font-size” in another. The same thing applies to the “filter” property that we’re using here. Initially you might think that you can add both leopard print and blur by using both classes:
<h1 class="leopard blur">This is an example of SVG filtered text</h1>
…but in practice one of the “filter” properties will override the other, so only a single filter gets applied (which one depends on how your CSS rules are written). The filter property can only take a single value, not a list of multiple values, so you can’t resolve the issue there, either.
If you want to use multiple filters on a single object, then unfortunately you have little choice but to construct an über-filter which combines all the filters you want to use into a single SVG filter element. It’s not as flexible as being able to apply multiple filters, but it’s also not as difficult as it sounds.
1) Create a document in Inkscape as above, adding your first filter
2) Add subsequent filters from the Filters menu – these will be appended to the first filter
3) Save the file and proceed as above, copying the über-filter from the Inkscape file into the XHTML file
In this way you can experiment with different combinations and ordering of filters within Inkscape before finally exporting your file. You can tweak each filter rule’s parameters in Inkscape’s filter editor and see the results applied immediately. This is a far more effective way to play with this capability than repeatedly changing the settings in the XHTML file and reloading the page in Firefox.
Conclusion
It’s common to see images used to replace text on websites, especially for headings. A good HTML coder will also add various tweaks and hacks to make the heading still work in text-only browsers or screen readers, not to mention making it visible to search engines. All this is a lot of extra work, which needs to be repeated every time a new heading is needed or an old one needs to be changed.
Many of these images are just text with a few stock Photoshop filters applied – exactly the sort of thing that could be achieved with SVG filters. By using SVG filters on HTML content the text remains as text – with all the accessibility and indexing advantages that implies. Unfortunately you have to weigh up these advantages against the enormous disadvantage of this technique only working in Firefox.
I can only hope that this functionality is made available in some (near) future versions of WebKit (Safari, Chrome, Konqueror) and Presto (Opera). I don’t hold out much hope for Internet Explorer, but as Microsoft has recently joined the SVG working group, there’s always a chance. In the meantime it’s an interesting application of technology but, like a lot of cutting-edge HTML, it’s not really practical for use on the web at large.


Great post, I didn’t realize that it was possible to use Inkscape filters in Firefox.
I wanted to add that Firefox now supports external references. No need to copy into your HTML. Just save the inkscape file, say filters.svg, and then use it in your css as:
.blur {
filter: url(filters.svg#filterid)
}
See https://developer.mozilla.org/En/Applying_SVG_effects_to_HTML_content
It works for me in Firefox 4 beta 6.
Nice tip, that makes it even easier to use them. Thanks for the info.
There are a couple of reasons why you might still want to embed them directly into the page:
(1) You ensure that the filter is already available when the page is rendered
(2) You avoid the overhead of the rest of the SVG file (Inkscape can create some big files, if you’re not careful) and another http request
But for testing/experimenting, or when the filter is to be shared amongst a number of pages, this is a great suggestion.